开发步骤
- 导入驱动文件
oled_ssd1306.c、oled_ssd1306.h、oled_fonts.h字体头文件 - 创建
oled_demo.c - 创建初始化oled函数
- 完成显示数据功能
- 创建线程并初始化
步骤1
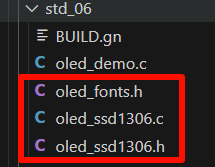
导入驱动文件:
- oled_ssd1306.c
- oled_ssd1306.h
导入字体头文件:oled_fonts.h
如下图:
步骤2
创建 oled_demo.c
步骤3
并创建 init() 函数对GPIO管脚及oled进行初始化
#include <stdio.h>
#include <unistd.h>
#include "ohos_init.h"
#include "cmsis_os2.h"
#include "wifiiot_gpio.h"
#include "wifiiot_gpio_ex.h"
#include "oled_ssd1306.h"
void init(void)
{
    GpioInit();
    OledInit();
}
步骤4
完成显示数据功能
static void OledTask(void *arg){
    (void)arg;
    init();
    OledFillScreen(0x00);
    OledShowString(0, 0, "Hello, HarmonyOS", 1);
    sleep(3);
    OledShowString(0, 0, "你好, HarmonyOS", 1);
    sleep(3);
    for (int i = 0; i < 3; i++) {
        OledFillScreen(0x00);
        for (int y = 0; y < 8; y++){
            static const char text[] = "ABCDEFGHIJKLMNOP"; // QRSTUVWXYZ
            OledShowString(0, y, text, 1);
        }
        sleep(1);
    }
}
步骤5
创建线程并初始化
static void OledDemo(void)
{
    osThreadAttr_t attr;
    attr.name = "OledTask";
    attr.attr_bits = 0U;
    attr.cb_mem = NULL;
    attr.cb_size = 0U;
    attr.stack_mem = NULL;
    attr.stack_size = 4096;
    attr.priority = osPriorityNormal;
    if (osThreadNew(OledTask, NULL, &attr) == NULL)
    {
        printf("[OledDemo] Falied to create OledTask!\n");
    }
}
APP_FEATURE_INIT(OledDemo);
编辑BUILD.gn文件
编辑1
在代码同级目录创建下面文件:
BUILD.gn
内容:
static_library("oled_demo") {
    sources = [
        # "aht20_demo.c","aht20.c",
        # "mq2_demo.c"
        #"colorful_light_demo.c",
        "oled_demo.c",
        "oled_ssd1306.c",
    ]
    include_dirs = [
        "//utils/native/lite/include",
        "//kernel/liteos_m/components/cmsis/2.0",
        "//base/iot_hardware/interfaces/kits/wifiiot_lite",
    ]
}
编辑2
编辑下面文件:
\\applications\sample\wifi-iot\app\BUILD.gn
内容:
import("//build/lite/config/component/lite_component.gni")

lite_component("app") {
    features = [
        # "code_v2.0/std_03:hello_demo",
        # "code_v2.0/std_04:traffic_demo"
        # "code_v2.0/std_07/ssd1306:oled_ssd1306",
        # "code_v2.0/std_07/examples:oled_test",
        # "code_v2.0/std_07/libm_port:libm_port",
        "code_v2.0/std_06:oled_demo",
    ]
}
启用I2C功能
编译代码
详见链接:
https://www.malaoshi.top/show_1GW1wTyUOMPk.html
烧写固件到芯片
详见链接:
https://www.malaoshi.top/show_1GW1wWWflGbq.html