创建生产者子模块
在父项目中,创建生产者子模块:fanout_producer
略
pom.xml
由于父项目已引入所有依赖包,所以pom.xml中不做任何修改
application.yml
server:
  port: 8081

spring:
  application:
    #服务名称
    name: rabbitmq-fanout-producer
  #RabbitMQ的配置
  rabbitmq:
    host: 127.0.0.1
    port: 5672
    username: guest
    password: guest
    #虚拟host 可以不设置,使用server默认host
#    virtual-host: RabbitMqHost
RabbitMQ配置类
功能如下:
- 创建 myexchange 交换机
- 创建 2个队列 notice、sms
- 将 myexchange 交换机 分别与 notice、sms 队列绑定
package top.malaoshi.config;

import org.springframework.amqp.core.Binding;
import org.springframework.amqp.core.FanoutExchange;
import org.springframework.amqp.core.Queue;
import org.springframework.context.annotation.Bean;
import org.springframework.context.annotation.Configuration;

@Configuration
public class RabbitMQConfig {
    public static final String QUEUE_NOTICE="fanout_notice";
    public static final String QUEUE_SMS="fanout_sms";
    public static final String EXCHANGE="fanout_exchange";

    //1.创建Exchange交换器-Fanout类型
    @Bean
    public FanoutExchange createExchange(){
        return new FanoutExchange(EXCHANGE);
    }
    //2.创建推送消息队列
    @Bean
    public Queue createNoticeQueue(){
        return new Queue(QUEUE_NOTICE);
    }

    //3.创建短信队列
    @Bean
    public Queue createSmsQueue(){
        return new Queue(QUEUE_SMS);
    }

    //4.创建绑定对象,将 推送消息队列 与 交换器 进行绑定,
    //fanout模式下无需routingKey名称,下面的Bean将本例的唯一交换器与闸机设备命令队列绑定在一起
    @Bean
    public Binding bindNotice(){
        return new Binding(QUEUE_NOTICE,//队列名称
                Binding.DestinationType.QUEUE,//目标类型为队列
                EXCHANGE,//交换器名称
                "",//fanout模式下,路由键routingKey无效
                null);//其他参数可以不填s
    }

    //5.创建绑定对象,将 发送短信队列 与 交换器 进行绑定,
    //fanout模式下无需routingKey名称,下面的Bean将本例的唯一交换器与监控设备命令队列绑定在一起
    @Bean
    public Binding bingSms(){
        return new Binding(QUEUE_SMS,
                Binding.DestinationType.QUEUE,
                EXCHANGE,
                "",
                null);
    }


}
说明:
- 创建的
FanoutExchange广播交换器 - 创建队列
- 通过
Binding类,将 交换器、队列进行绑定
controller
package top.malaoshi.ctrl;

import top.malaoshi.config.RabbitMQConfig;
import org.springframework.amqp.rabbit.core.RabbitTemplate;
import org.springframework.web.bind.annotation.RequestMapping;
import org.springframework.web.bind.annotation.RestController;

import javax.annotation.Resource;

@RestController
@RequestMapping("/")
public class ProducerController {
    @Resource
    private RabbitTemplate rabbitTemplate;


    @RequestMapping("/sendNotice")
    public String sendNotice(String msg){
        //将消息发送给交换机
        rabbitTemplate.convertAndSend(RabbitMQConfig.EXCHANGE,"", msg);

        return "【" + msg + "】 已发送!";
    }
}
注意: 这里调用 rabbitTemplate.convertAndSend() 的参数不同,这是 3个参数
主启动类
import org.springframework.boot.SpringApplication;
import org.springframework.boot.autoconfigure.SpringBootApplication;

@SpringBootApplication
public class Main {
    public static void main(String[] args) {
        SpringApplication.run(Main.class, args);
    }
}
启动服务
启动主启动类
访问 rabbitmq web管理页面
访问 http://localhost:15672/ RabbitMQ管理页面,此时 没有 消息队列
这是因为 懒加载 方式,没不会创建队列
发送消息
访问 http://localhost:8081/sendNotice?msg=李雷关注你 ,会发送消息,消息内容是 李雷关注你
访问 rabbitmq web管理页面
消息队列
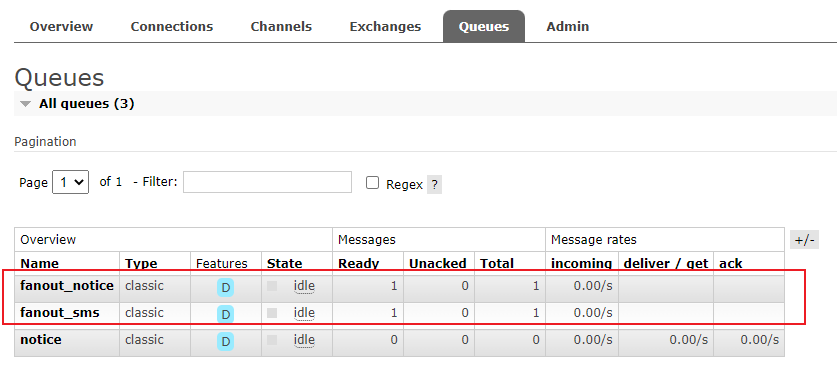
可以看到消息队列 fanout_notice、fanout_sms:
交换机
可以看到交换机 myexchange:

点击交换机,可以查看到绑定的队列:
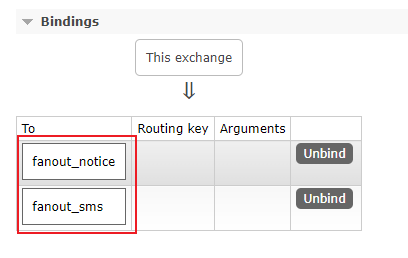
也可以解绑定